

ZE POTATO
ZE POTATO
super secret rare info that you certainly can't find anywhere else online


Click here for a Downloadable PDF file
Growing potatoes in containers is the perfect first step for those who want to grow, to be caretakers of plants and help ensure food security for themselves and their families; there is a reason that whole societies made it through famines using mainly potatoes. Potatoes are God in the form of a small earthen dumpling that constantly reproduces.
Potatoes are also very, very low maintenance. I’ve heard stories of potatoes growing in buckets of sawdust and dirt with just a little fertilizer added. Basically, potatoes are gonna grow no matter what you do with them, which makes them the perfect place to start for beginning gardeners.
Step 1:
Start sprouting potatoes. Go to the grocery store and buy 1-2 potatoes for every bucket you plan on growing. Could be gold, red, purple or russet potatoes, whichever you like best or a combination of them all, just remember that 5-gallon buckets are not big, so smaller potatoes might be a better choice. Start by simply letting them sit untouched in your cupboard for 1-2 weeks. After this, they will start to have chits (sprouts) coming out of them. At this point, find a small tray that fits in your cupboard. Cut each sprouted potato in half, then place the potato halves, cut-side down. Let them sit for another 1-3 weeks and continue to sprout. You must allow a few weeks for sprouting, and you’ll know they are ready once their are sprouts coming from all over the potato and the cut side is scabbed over. The scab over the cut side is necessary to prevent moisture, rot, and disease from infiltrating the potato while it’s in the soil.


In the meantime:
Step 2:
Assess your space. How many buckets do you have the space for? Do you have a yard, balcony, or patio? Is your only option growing indoors? First thing is decide how many buckets you can reasonably take care of.
Step 3:
Secure the bucket. You can buy 5-gallon buckets from hardware stores, but if you prefer to spend as little money as possible, try going to local restaurants and ask them if they have any 5-gallon buckets they’re going to get rid of. Restaurants generally go through a lot of 5-gallon buckets, and local ones would likely be happy to let them go for good use. Once you have secured the buckets, poke or drill holes into the bottoms of them. One hole in the center and a ring of holes around the outside rim should be sufficient, maybe a couple extra for good measure. Along with the bucket, and only if keeping indoors, you may need trays to put underneath the bucket and catch any running water.
Step 4:
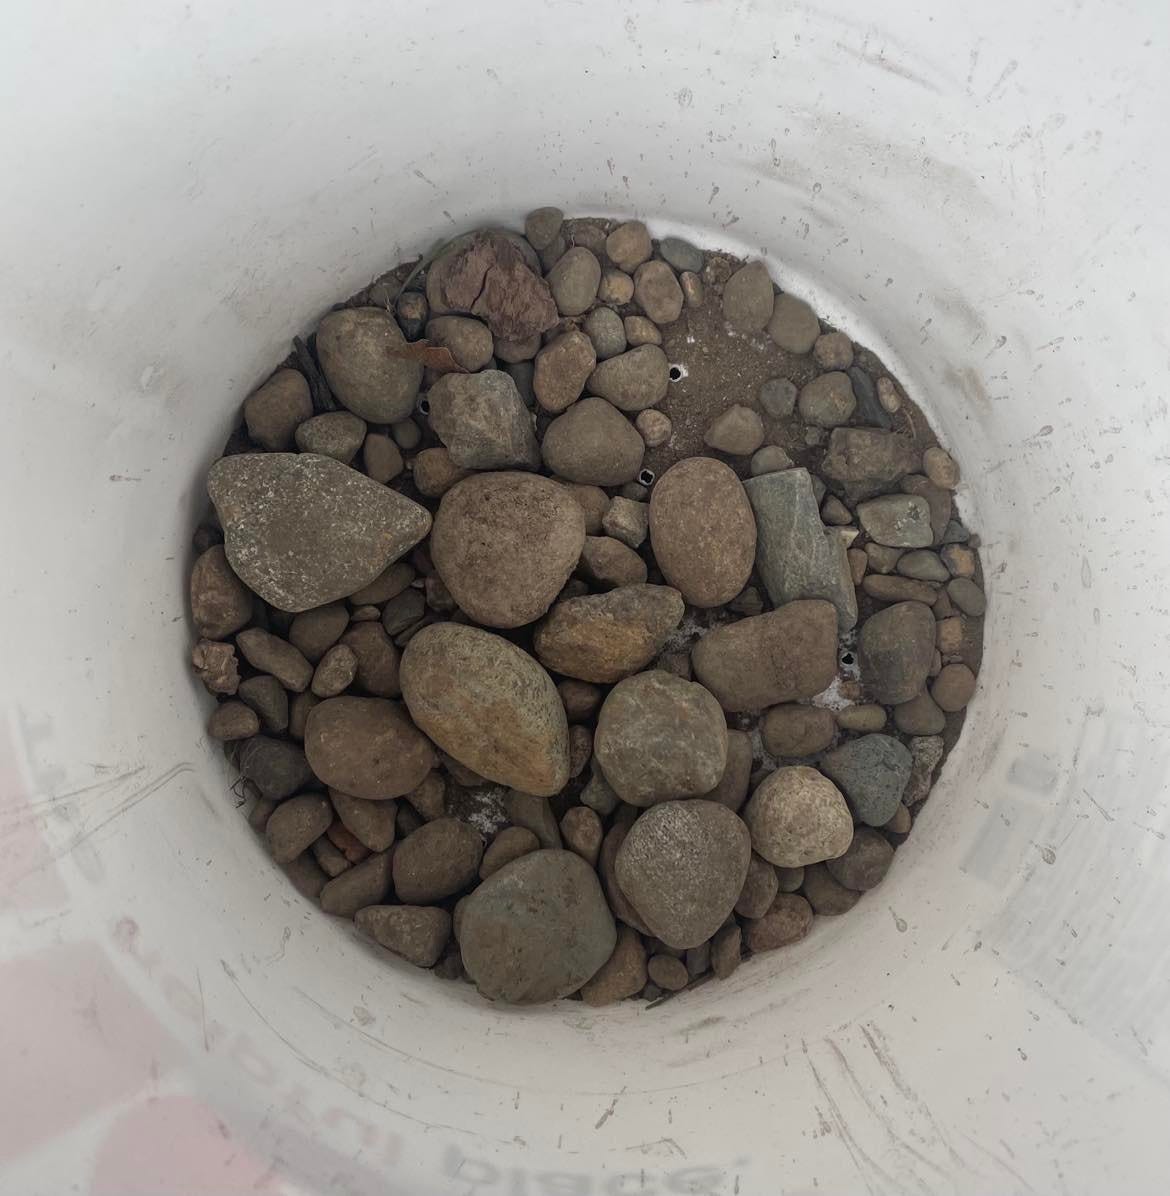
Gravel or rocks. I’ve found that the one thing potatoes really like is a well-drained container; placing a 1-2 inch layer of gravel or small rocks on the bottom before you put in the soil can help with draining and prevent water from pooling up at the bottom of the soil. Another thing that helps drainage is adding straw or dry, straw-like plant matter into the soil and mixing well, but this is not essential.
Step 5:
Secure the soil. Depending on how many buckets you’re planning on taking on, you need about 2 small bags of potting soil per bucket. Soil is not expensive, especially during Spring, so be sure to stock up in the Spring. I’ve been able to find all-purpose potting soil for about $2.99 a bag or less, depending on the size of the bag.
Step 6:
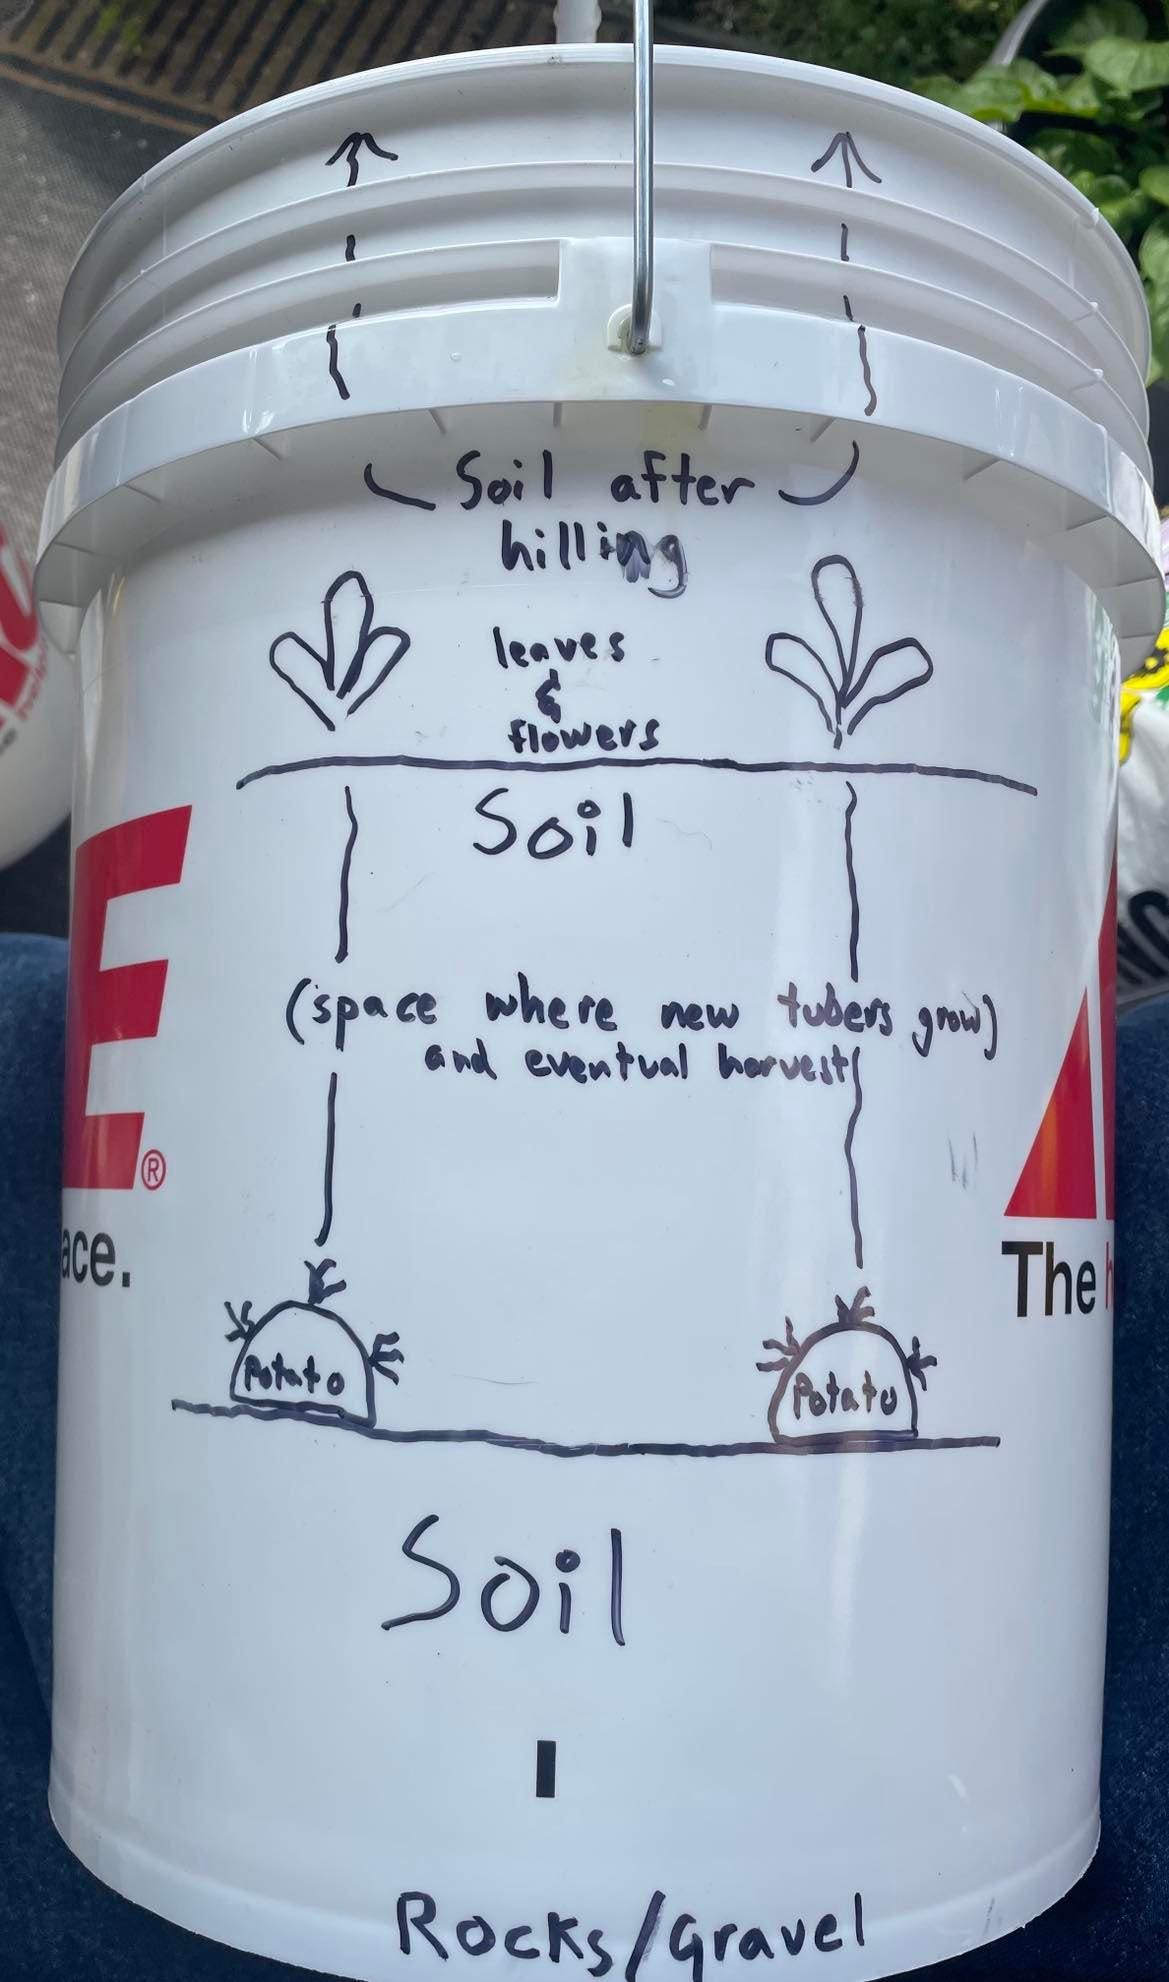
Once your potatoes are sprouted and the cut side is good and scabbed over, you can plant them! Start by putting about a 4-inch layer of soil at the bottom of the bucket, as you don’t want the cut halves touching the bottom.
After you’ve placed your first (4-inch) layer of soil on the bottom, you can then place your sprouted potato halves on top of that layer of soil, cut side down. It is important to only place 2 or 3 (at most) sprouted potato halves inside the bucket at this time, as you do not want to overcrowd in such a small container. Place them on either side of the bucket, about 4 inches apart.

From there, add about 5-6 inches of soil on top, without compressing or packing it down. After this, give it about 1/4 inch of water, and you’re done for now!
Helpful tip:
The figure below shows the approximate layers underneath the soil and how far up to go with the soil. Once the tubers have grown past the top layer of soil, they will start to form leaves that grow very quickly and abundantly. Once the leaves grow to about 5-6 inches above the top layer of soil, you will start the hilling process.
Watering:
I usually add about 1/4 inch of water every other day. Potatoes are pretty easy and forgiving, but they definitely do not like to be over or underwatered. So each day give the top of the soil a touch to make sure it’s still moist, if it’s good and moist you can water again every other day, but if it feels like it’s drying out, give it a good spritz of water that day. For beginners, you can buy moisture-control potting soil that helps prevent over or underwatering.
Sun:
Potatoes like a good bit of sun, so if you’re growing on a porch, feel free to move them into the sun on sunny days and then put them back overnight. I live in Seattle where we get lots of rain, so I move them into the sun on sunny days, then bring them back under the patio before nightfall in case it rains overnight, as you don’t want them to get waterlogged.
The picture below shows potatoes that are ready to be hilled, in a different container that I used previously:
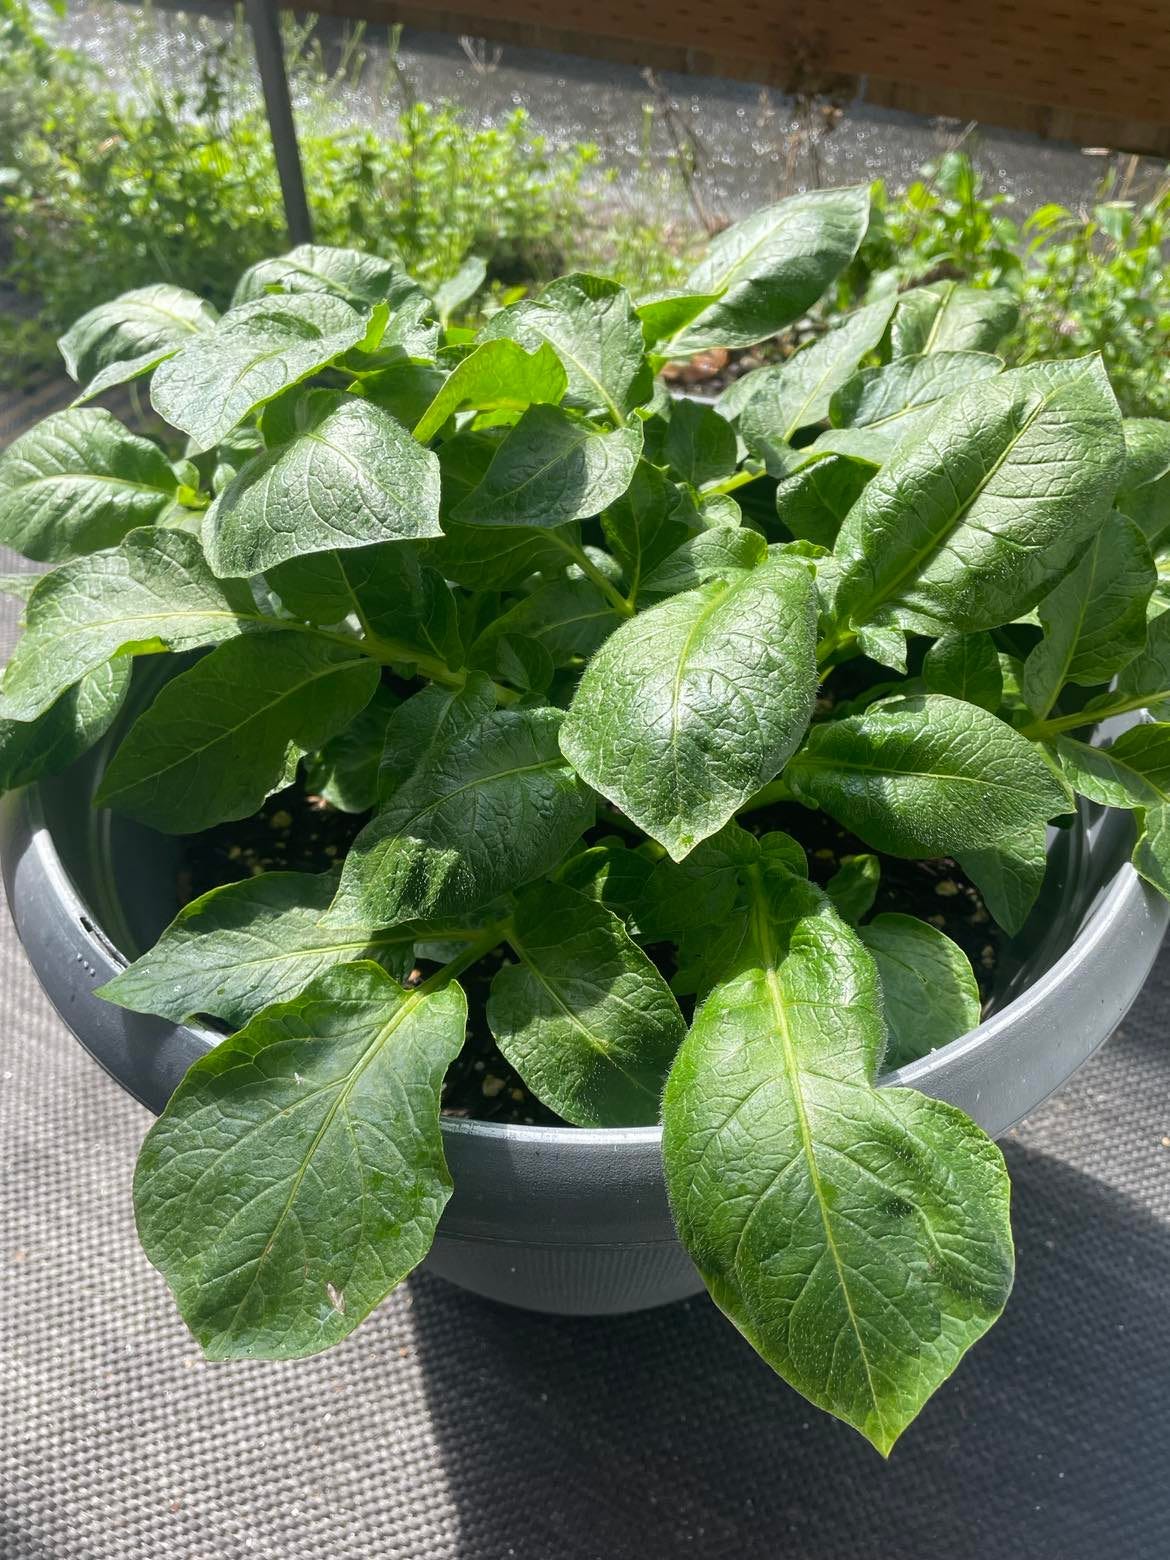
Once your potatoes get to this point, you’re ready to start the hilling process that produces even more potatoes!
Hilling:
The hilling process is simply adding a new layer of soil underneath the top leaves, in order to fill the space between the previous layer of soil and the top of the container being careful not to bury any of the large leaves. This allows for more space to grow more potatoes!
All you need to do for the hilling process is to carefully add more soil by hand around the base of the protruding plants, until the next layer of soil stops about 1 inch from the rim of the container. Pat down until it becomes a flat layer, but don’t pack it down too hard. From there, give it another 1/4 inch of water and you’re good!
Harvesting:
Potatoes are very helpful and communicative, in that they show you the signs that they are ready to harvest! Early crop potatoes (thin-skinned, new potatoes that are not suitable for long term storage) are usually ready to be dug up and consumed after the potato plant flowers on top.
Long-term storage potatoes take a bit longer in the soil and require a curing process after harvesting, but you will know they are ready for harvest because the plant itself will wilt, turn yellow, and die off! Once the plant has turned yellow, let it dry out for a week without watering, and take it out of open air where there is the risk of rain.
Each bucket should yield about 1-3 pounds of potatoes.
To harvest the potatoes, start by trimming off the top layer of foliage, then simply lay down a tarp and gently dump the buckets over them. You can then dig through the soil and find the potatoes. Like searching for buried treasure.
Curing potatoes for long-term storage:
To cure potatoes for long-term storage, make sure to not wash them after harvesting. Lay them out in a short tote or tray in a cool, dark, dry place with temperatures about 50-60 degrees. Let them rest for about 2 weeks. This will make the skins thicker and stronger and allow you to store them for longer.
To store potatoes for long-term, put them in a well-ventilated container such as a cardboard box with holes poked in it, or a crate. This allows moisture to evaporate. Place the container in a cool, dark, dry place where temperatures can stay between 35 and 60 degrees. Cover the container to keep light out, preventing sprouting.
Enjoy, baby
𝕊𝕀𝕃𝕂 ℝ𝕆𝔸𝔻 𝔾𝕆𝕌ℝ𝕄𝔼𝕋
X
Variety Jones

Pay to subscribe if you love and support us. If not it’s cool, everything is up for free anyway. Just enjoy that shit either way.

Thank you.